Saturday, December 27, 2008

Happy Christmas Mate

This card uses a super-cute Stampin' Up! set that is only available to stampers in Australia or New Zealand. I am lucky to have a good friend in Australia who bought this for me, knowing how much I love beach-themed stamp sets, especially those with a cool Christmas twist!

Nothing terribly special about this card, I colored Santa with some Prismacolor pencils and made some of the waves dimensional using Stampin' Dimensionals. Very easy!

Wednesday, December 17, 2008

Home for the Holidays: A Mini-Tutorial

A few people have asked me about the window effect in this card, and how I went about doing it. I've never done a tutorial on my blog before, but I've learned so much from other blogs that this seems like the perfect opportunity to start!    
windowcloseupIf you look closely, you can see that I tried to make the windows in this card look like real glass. It's somewhat time-consuming, but not hard at all! Just allow yourself a few extra hours for everything to dry. As you may have already figured out, there is one small problem with my technique - the wreaths are behind the glass! I suppose there must be at least one family out there who hangs their wreathes inside the windows, I'm just going to go with that thought.

dsc_0015First of all, I stamped, colored and embossed my large Boards & Beams house on kraft paper using a black ink. For Papertrey and all other clear stamps, I prefer Palette ink, but any black ink pad will work.  I then colored the roof with colored pencils, again though - any pencil or marker of your choice works just fine. Finally, I embossed the roof using the supplemental Home for the Holidays set using versamark and white embossing powder. 

Using my Fiskars Fingertip craft knife, I carefully cut out all the little windows. You can use a regular exacto knife, but the fingertip knife is the bomb! You can get really fine, precise cuts without feeling like you are going to break your finger off. I just used my paper snips to cut the house out of the kraft paper. 

dsc_0014Next I stamped the same image again, this time using a brown ink onto white or eggshell cardstock cut using my square Nestabilities. I then stamped in the wreath using green ink and very quickly colored in the ribbon with a red marker. When I say quickly, I mean quickly - you don't have to be terribly precise, you are just going for the look of a wreath hanging in the window.         
Notice how I used a slightly smaller square then the house? The roof overhangs it slightly as you'll see in the finished card. I did not cut off the top of the house on the kraft piece. At this point you need to allow the stamped image to air dry for an hour or heat-set with your embossing gun. If it's not dry, the ink will bleed and look fuzzy after adding the window treatment.


dsc_0016 
dsc_0018

Apply dimensional adhesive to the back of your kraft house, and adhere to the white stamped image, lining up the windows. 


dsc_0019Now, just take some Glossy Accents or Crystal Effects (Stampin' Up!) and squeeze some into the window opening. These mediums are thick enough that they won't leak through the sides of the house, they will stay within the edges of the window openings. Probably any glossy medium would work here, Diamond Glaze, Sculpey Glaze, etc.  You'll need to allow this to dry for 3-4 hours. 


After this is done, assemble your card as desired and voila!


iphoto-47


Friday, December 12, 2008

Home for the Holidays


Is this my first Christmas card post? Seriously folks, I'm so far behind. I'm happy and blessed to be working full-time, but I'm so exhausted at night I just haven't had much energy to be crafty.

However, I have found a new time to get stuff done. I have an hour lunch break and so earlier this week I took my Revolution and some paper and did some die-cutting in my car during my lunch hour. Isn't that sad? I eat lunch in the car! I'm learning to embrace the quiet, but I have to keep my radio off because it drains the battery. I had to have somebody jump-start me today! Anyway, the Revolution is PERFECT for car die-cutting. I'm going to leave in my trunk. It's small enough that I can hold it, but it has a nice magnetic base so my nesties don't slide around. Awesome.

This is one of my Christmas cards this year. I'll probably only get out 10 or so of these because of the amount of time it takes to make each one. I cut out the red scallops and vanilla squares during my lunch break :)

Recipe:
Stamps: Papertrey Ink
Boards & Beams, Papertrey Ink Home for the Holidays, Papertrey Ink Silent Night
Paper: PTI Vintage Cream, PTI Pure Poppy, Kraft, Cosmo Cricket, Basic Grey Wassail
Ink: PTI Pure Poppy, Distress Tea Dye, Stampin' Up! Black, Palette green (doesn't matter what shades you use really)
Ribbon: Martha Stewart Red Seam Binding
Accessories: Tim Holtz Distress Stickles, MS Snowflake Punch, Gold brads, Markers, Nestabilities square, scallop square, and tag die, Ranger Glossy Accents

Sunday, November 30, 2008

Sizzix Hello Kitty Cards


Friday (and again Saturday) I braved Jo-Anns Black Friday sale to get three Hello Kitty Sizzix dies at 60% off. I could write an entire post about this experience, but in an effort to stay positive and joyful this holiday season, I'm simply say that they irritation I felt has started to subside. I'll save my real disappointment for the letter I plan to write to Jo-Anns customer service. (Can you say: rude cashiers, bad crowd control, & prices ringing up incorrectly?).


Here are two cards I made with my new dies. I'm not even a true HK fan (Rachel, if you are reading this, go away NOW!) but I really have some cute card ideas for my good friend, who really is a true fan. I endured all the pain mentioned above with the sole purpose of making her the cutest, card, evah.

Not one single stamp was used on this card.

Recipe
Stamps: NONE
Paper: Generic cardstock in hot pink, purple, and black.
Ink: NONE
Accessories: Stickles, American Crafts Brads, Sizzix Hello Kitty dies, Cuttlebug Swiss Dots Embossing Folder

Tuesday, November 25, 2008

Baby Girl Stoplight Card


Are you wondering why I called this a stoplight card? When I originally made it for the recipient's baby shower, the little dresses were unintentionally configured as red, yellow, green from top to botoom - just like a stoplight! But, the office I work in deals with a lot of auto accidents, so I was afraid my co-worker might think there was a connection I didn't mean to be there, so I switched it around. KWIM? I know, not that exciting of a story! LOL.

Recipe:
Stamp: Inkadinkado Baby Girl, Cornish Heritage Farms Polka Dot Backgrounder
Paper: Pink Pirouette (Stampin Up), Whisper White
Ink: Palette PTI Colors (various shades), Distress (various shades)
Accessories: Martha Stewart Doily Lace Border Edge Punch, Oval Nestabilities

Monday, November 17, 2008

Crab & Company Boy Birthday Card

Olivia and I had the pleasure of attending a birthday party at the local aquarium. In honor of the ocean critter-themed party, I chose Stampin' Up!'s Crab & Company stamp set for this card. It's very similar to another card I posted recently, I just changed up the colors a little and added some EK Success blue wave pattern paper.

I added some Tim Holtz Distress Stickles in Antique Linen to the sand, and Broken China to the sky area. I have previously sponged both of those colors with the matching distress ink, then added the stickles. The distress stickles don't have the same shimmery glittery look that regular Stickles have, but they add texture. The Antique Linen looks exactly like sand -- which was perfect for this application.


RECIPE

Paper: Stampin' Up! Pacific Point Whisper White, Tangerine Tango and Baja Breeze; EK Succes(patterned paper)
Stamp: Stampin' Up! Crab & Compnay
Ink: Stampin' Up! Basic Black, Pacific Point, Distress Antique Linene and Broken China
Accessories: Nestabilities, Distress Stickles, Markers, Pencils, Crystal Effects, Googly Eyes

Thursday, November 6, 2008

A little slow

Hello blog-surfing friends! FYI - I've just started a new job so my posting & phone call returning is a little slower. I have to get used to waking up and making myself look presentable at an ungodly early hour, so it may be a couple of weeks until I feel like I have a real life again.

Please continue to email or call or with your questions and/or orders.

Saturday, October 25, 2008

Haunted House #4


Edited: I have found the original inspiration for this, see the end.


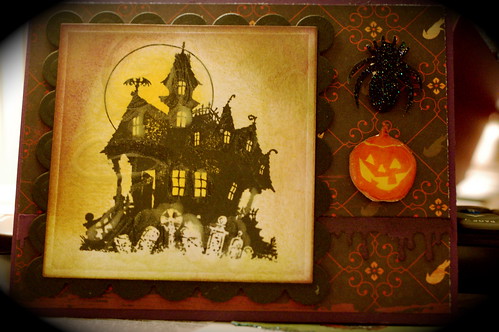
Halloween is a week away, which for me triggers the start of Christmas card-making. This card again uses lots of Michelle Zindorf style brayering, with some sponging and distressing. It really takes no time at all and I feel like my brayering is really improving. It's a wonderful technique and the dramatic results work perfectly for Halloween cards and projects.
I was actually inspired this morning by a mylar balloon that I saw in Publix. The image is almost exactly what you see here. The background was a gradient from purple up to green, with a red to yellow sun. The haunted house and tree were so close to the Stampin' Up! House of Haunts image that I had to make it. I used mostly Stampin' Up! inks for the background, and Classic Black for the tree. No versamark or embossing here. The moon was brayered on a separate two-inch circle and adhered to the background. I then stamped onto the panel with the haunted house. Just prior to stamping, I very carefully removed the ink from the moon portion of the stamp, since I already had that on my panel. Unfortunately, there was a gap in the stamped image where the moon attaches, but I used a black marker to fill in any gaps. I also misjudged the position of the tree and the house, and sponged some more black to make it look more connected.
The googly eyes glow-in-the-dark when you turn off the light. This was Olivia's addition to the card, and they came from one of those foam haunted house kits at Michael's. She's obsessed with glow-in-the-dark products. We've cleared out Michael's of all their glow-in-the-dark paints, clay, foam, etc. Fun!

This photograph highlights every flaw, the card actually looks really cool in person.

Click on the image to see a larger version, with our cat in the background. His name is Bill.
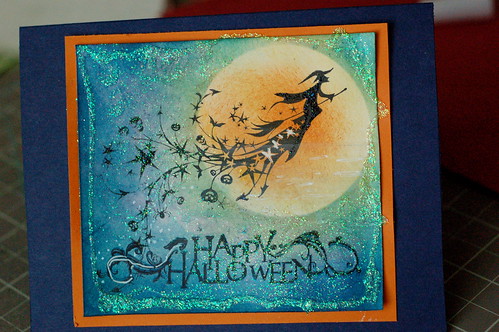
EDITED TO ADD: My crack Google research skillz (aka hours of mindlesss internet browsing) have finally paid off. I have located the balloon that I spotted at the grocery store which was my inspiration for this card. You can see it here.

I could have sworn the colors went from green to purple, not purple to blue as shown here - and I don't recall the cemetery at all. Although I managed to see the moon correct. I definitely remember the tree with the eyes and if I had some decent gel pens I wanted to do that on my card. I also reversed the images, but either way hopefully you can see the resemblance between the balloon and my card.

I'm going to try again, using this color scheme and maybe embellish with more of the bats and spider webs. Only a few days left to stamp these spooky scenes!
Recipe:
Stamps: House of Haunts (Stampin' Up!)
Ink: Stampin' Up! - Eggplant Envy, Green Galore, Garden Green, Classic Black, Summer Sun, More Mustard, Pumpkin Pie; Other Inks - Versamagic Chalk Perfect Plumeria, and Aegean Blue. Distress Tea Dye
Paper: Stampin' Up! Whisper White, Papertrey Ink Plum Pudding
Accessories: Heidi Swapp Distresser, Brayer, Adhesive, Glow-In-Dark Googly Eyes from a Michael's foam craft kit.
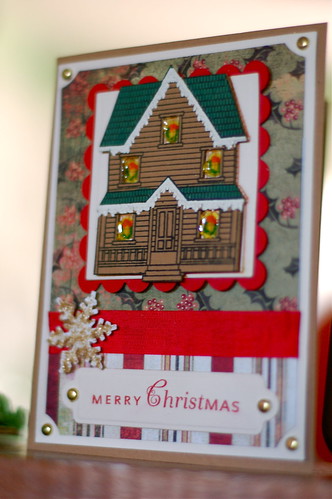
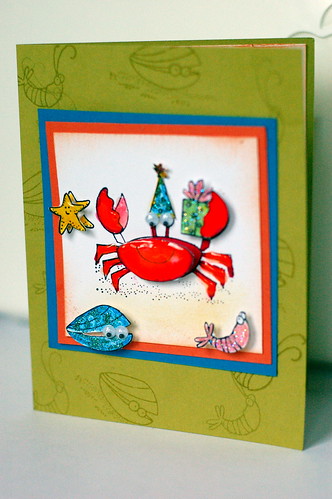
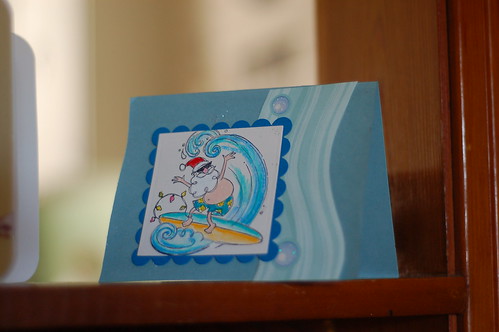
Monday, October 20, 2008

Bella Rose Top Note:A Variation

This card is a variation on one I made earlier last week using Bella Blossoms and the Top Note die. This one adds a litle Bella Rose DSP (designer series paper) and I mounted the front onto Pink Pirouette In Color cardstock. The edge of the Top Note Bigz die is sponged with Pink Pirouette ink.

Recipe (all supplies Stampin' Up!)
Stamps: Bella Blossoms
Ink: Rose Red, Kiwi Kiss, Pink Pirouette
Paper: Bella Rose DSP, Pink Pirouette
Accessories: Scallop Edge Border Punch, Slot Punch, Top Note Bigz Die, Sponge Daubers

Sunday, October 19, 2008

Eastern Blooms & Stampin' Pastels Card

I'm going to change up the Halloween theme a bit to show you this card using Stampin' Up! products from the new catalog. The stamp set is Eastern Blooms and the colors are Tangerine Tango and Pacific Point (In Colors). Flowers are stamped with Versamark ink, then Stampin' Pastels are applied to the Versamark using a sponge dauber. I trimmed each flower using my snips. This doesn't take as long as it sounds.

And please don't fault my Stampin' Up! White Craft pad for the poor result with the polka dots. It's very old and I think time to replace with a fresh new pad.

Recipe:
Stamps: Eastern Blooms, Polka Dot Background, Sentiments
Ink: Versamark, White Craft
Accessories: Stampin' Pastels, Scallop Edge Border Punch, White Embossing Powder

Saturday, October 18, 2008

Go Rays!

Tampa Bay Rays Logo


Y'all know I NEVER do sports-themed posts, but we're on our way to the AL Game 6 at Tropicana Field. I'll post of picture later of the t-shirt my very crafty mama made for me to wear!

Go Rays!

Friday, October 17, 2008

More Haunted House Halloween Cards

No other holiday or event has any many wonderfully cool papercraft products as Halloween. Scrapbook papers, punches, stamps and embellishments are at their best at Halloween, and I buy as many as I can. I especially love Haunted Houses. I have a few great Haunted House stamps, but unfortunately most of them are still in storage.

This is the new one from Stampin' Up! called "House of Haunts."

It's very cool, especially with the little cemetary scene in front. I'm not exactly thrilled with the colors, but it's still cute. In a few days I'm going to case this beautiful Haunted House card. I even got the Boards & Beams stamp set!

Not visible in these pictures in the glow in the dark paint I used to experiment with the haunted house. After stamping the house in black, I simply painted on a few accents on the windows with DecoArts Glow In The Dark paint. It makes a fun touch for a spooky card and kids go crazy for it!

Here is Olivia's(5 years old) version of the same card.


Recipe:
Stamps: Stampin' Up! House of Haunts
Ink: Elegant Eggplant, Basic Black, Versamark, So Saffron
Paper: Cosmo Cricket, SU Cardstocks
Accessories: Martha Stewart Drippy Goo Border Punch, Glossy Accents, Martha Stewart Spider Punch, Square Nestabilities

Sunday, October 12, 2008

Stampin' Up! House of Haunts Card


This is another card based on the brayering technique that I originally learned from Michelle Zindorf's inspiring blog. Please head over there for her tutorials.

Brayering adds a dramatic feeling to a scene, which I think is perfect for a Halloween card.

I hope you enjoy!

Recipe:
Stamps: House of Haunts
Ink: Night of Navy, Not Quite Navy, Kiwi Kiss, Elegant Eggplant, So Saffron, Really Rust
Paper: Whisper White, Elegant Eggplant, Classic Black, White Gel Pen
Accessories: Sponges, Brayer , Stampin' Dimensions

Tuesday, October 7, 2008

Stampin' Up! Big Shot/Big Kick Compatibility

Recently I have read numerous questions regarding compatibility among Stampin' Up!'s new Big Shot die-cutting machine and dies & other competing brands. In order to help answer some of your questions, I'd like to present some information to help clarify compatibility with the Stampin' Up! Big Shot.

First of all, let me just answer some very frequently asked questions (VFAQ?):

  1. "Will my my Cuttlebug dies and embossing folders work in the Stampin' Up! Big Shot?" YES

  2. "Will the Stampin' Up! BIg Shot dies work in my Cuttlebug?" YES

  3. "Will the Stampin' Up! Top Note die work in my Cuttlebug?" YES

  4. "Do Spellbinders Nestabilities work in the Stampin' Up! Big Shot?" YES

  5. "Will Cuttlebug Embossing Folders work in the Stampin' Up! Big Shot?" YES


However, keep in mind that there are some exceptions. Remember that while die-cutting manufacters generally try to make their machines as universally compatible as possible, the only "sure-fit" will usually be with the dies and machines made by the same manufacter. For example, it's pretty obvious that any of the Stampin' Up! dies will certainly fit in the Stampin' Up! Big Shot. And because it's manufactured by Sizzix, ANY Sizzix products from other retailers will fit in the Big Shot too! The same goes for Cuttlebug, all Provo Craft dies will fit in the Cuttlebug machine. However, Stampin' Up! Big Shot owners also get the benefit of being able to use just about any die or embossing folder available, including Cuttlebug and Spellbinders.

But, when using a die manufacturered for a different machine, plan on tweaking until you find the right fit. In my personal experience, Cuttblebug dies and folders work perfectly fine in the Big Shot without any tweaking. The Nestabilities dies also cut beautifully in the Big Shot. However, embossing with the Nestabilities requires adding just the right amount of shim to make the embossing crisp. This is just a matter of experimenting until you find the right thickness to make the sandwich work. Once you've mastered this one time, you'll know exactly what you need to do each time in the future.

So, in summary, it's fair to say that for the most part - the Stampin' Up! Big Shot will work with every available die, but just remember that some dies may take a little bit of effort in terms of determining what the appropriate sandwich is. And of course, email me if you has any questions!

For more on die cutting, please check out my die-cutting tutorial.

Saturday, October 4, 2008

Zindorf-Inspired Halloween


Are you familiar with Michelle Zindorf's beautiful cards? Her blog has very detailed tutorials
describing her sponging and brayering techniques, I highly recommend a visit if you need a little (or a lot of) inspiration.

These cards are my interpretations. On the first (navy blue) card, I had a lot of help from my 5 year-old daughter. She decides that some stickles covering the entire card were in order. I actually like the shimmery effect on top of the brayering, and next time might try adding some twinkling H20s or something along those lines to add some shimmer without all the glitter. Remind me to hide the glitter...

Although I'm really happy with the scenes themselves, I always get stuck with appropriate placement and design on the card itself. I like the orange one because the focal point is square, and I put it on a square card. I should have done that with the blue one as well.

Recipe:
Stamps: Inkadinkado Halloween
Paper: Stampin' Up! (various colors)
Ink: SU! - Elegant Eggplant, Night of Navy, Not Quite Navy, PTI - Lemon Tart, Summer Sunrise

Sunday, August 17, 2008

I really need to stop...


...playing with retired stamps. I can't resist this froggy set though - I keep reaching for it over and over! I really want (and need) to get some samples made using the new stuff! I'm going to have to ask someone to hide Unfrogettable from me so I don't use it for a while. Or, I could just not worry about it. I think I'll go with the latter. Life is too short to hide from retired stamps! He's blank on the inside for now, when I have the right occasion to send it, I'll decide which sentiment to use.

Stamps: SU! Unfrogettable, Polka Dot BG
Paper: PTI Lemon Tart, Summer Sunrise and SU Kiwi Kiss
Ink: Stazon, Palette Landscape
Accessories: Pencils (no gamsol)

Wednesday, August 13, 2008

Crab & Co. Card


If you are a fan of the now retired "Unfrogettable," then you should take a look at Crab & Co. It's not new, but very cute with the same style of line drawn images and punny sentiments. Here's a birthday card I made.

Recipe Paper: Kiwi Kiss, Pacific Point, Tangerine Tango, Whisper White Stamp: Crab & Co Ink: SU! Classic Black Accessories: Dimensionals, Crystal Effects, Markers, Googly eyes

Monday, April 7, 2008

Elvis Thank You

I made this thank you card using the Elvis Presley stamps from Cornish Heritage Farms. I am not an Elvis fan, but I could not resist when I saw the "Thank You, Thank You Very Much" stamp. The red cardstock is embossing using one of my new Cuttlebug embossing folders.

Saturday, April 5, 2008

From the Kitchen Of...


This is a set of recipe cards and matching gift box I made as a gift. It went together really quickly. I might make a few more sets of these for end of year teacher gifts. The stamps used are all Stampin' Up! -- "From the Kitchen Of" and "Tart & Tangy." The paper used is Whisper White and Summer Picnic. Both Summer Picnic and Tart & Tangy are from the Occasions Mini. (Tart & Tangy and Summer Picnic are now available in the Fall/Winter '08 Catalog).

Monday, March 24, 2008

Heirloom Pro Rubber Stamp Show

A few weeks ago my daughters and I traveled to Indy to attend the Heirloom Productions Rubber Stamp Show. It was our first time and we really enjoyed it! It's all about shopping of course, and my wallet was not immune. I bought several unmounted stamps and EZ-Cling from Beeswax. They have a great variety of scenic stamps. I'd never bought UM before but now am hooked.

Thursday, February 28, 2008

Happy Birthday

This is a super quick and easy birthday card using Greetings Galore. Paper is Old Olive and Bali Breeze. I punched Whisper White cardstock and stamped the birthday greeting in Classic Black. The cake is colored with stampin' pastels and highlighted with my white gel pen. I don't know where I got the ribbon from? It's leftover ribbon from Christmas tags. I used my Versamark pen to create faux polka dots on the cardstock base since my mom has "borrowed" my mini-backgrounds set. I sort of "over sponged" the Pixie Pink ink on my scallop square - oops. Seems much more noticeable in the pic than in real life.

Wednesday, February 27, 2008

More Card Mojo

I've hit the wall in school. I'm so close to that end that I'm now finding it very difficult to be productive. Unfortunately, I have two big papers, classes and so much other stuff to do. I also have to prepare to move back down to Florida! Yikes. So stressed. Anyway, I allowed myself to be extra crafty the past couple of days (it's the best therapy). The new Stampin' Up! rub-ons gave me some crafty mojo. Here's a slideshow of several cards I've completed.

Tuesday, February 26, 2008

Just checking in

I got some new mojo over the weekend thanks to my new Sale-A-Bration rubons and some Mucinex-D. I'll be posting some cards soon. In the meantime, I wanted to direct your attention to some very helpful blog posts that will save you money. I've provided a link to some money-saving alternatives for some really cool scrapping and stamping products.

Dew Drops - Lauren's super-cheap and readily available alternative.

Ticket Punch - My own alternative. You can use ANY size circle punch to get the same effect. In fact, if you use different size punches then you can achieve a variety of different "ticket" punch looks.

Homemade Prima - Using punches, a stylus and a ball-tipped tool. Awesome!

Monday, February 11, 2008

Chicago in 48 Hours

We spent the weekend in Chicago for some job search activities and saw Wicked and visited Dick Blick (those Copics, TDF!)


Friday, January 18, 2008

Whoops!

I fell on the ice and cracked my elbow.  And now I can't do anything with my left arm, and since I'm left-handed this is a big bummer. I tried stamping but no good, so I'm on a temporary stamping and crafting hiatus until I regain some mobility.

Thursday, January 17, 2008

Under the Sea

More fun with copics. This stamp is from Stampland. I used Palette Noir ink and prima flowers. The little buttons are from making memories.

Wednesday, January 16, 2008

Sunday, January 13, 2008

Altered Target Mailboxes


The cute little $1 mailboxes from Target are popping up all over. I have a few of my own now and have just started altering. In the meantime, here is one I did and links to other examples: