Saturday, December 27, 2008

Happy Christmas Mate

This card uses a super-cute Stampin' Up! set that is only available to stampers in Australia or New Zealand. I am lucky to have a good friend in Australia who bought this for me, knowing how much I love beach-themed stamp sets, especially those with a cool Christmas twist!

Nothing terribly special about this card, I colored Santa with some Prismacolor pencils and made some of the waves dimensional using Stampin' Dimensionals. Very easy!

Wednesday, December 17, 2008

Home for the Holidays: A Mini-Tutorial

A few people have asked me about the window effect in this card, and how I went about doing it. I've never done a tutorial on my blog before, but I've learned so much from other blogs that this seems like the perfect opportunity to start!    
windowcloseupIf you look closely, you can see that I tried to make the windows in this card look like real glass. It's somewhat time-consuming, but not hard at all! Just allow yourself a few extra hours for everything to dry. As you may have already figured out, there is one small problem with my technique - the wreaths are behind the glass! I suppose there must be at least one family out there who hangs their wreathes inside the windows, I'm just going to go with that thought.

dsc_0015First of all, I stamped, colored and embossed my large Boards & Beams house on kraft paper using a black ink. For Papertrey and all other clear stamps, I prefer Palette ink, but any black ink pad will work.  I then colored the roof with colored pencils, again though - any pencil or marker of your choice works just fine. Finally, I embossed the roof using the supplemental Home for the Holidays set using versamark and white embossing powder. 

Using my Fiskars Fingertip craft knife, I carefully cut out all the little windows. You can use a regular exacto knife, but the fingertip knife is the bomb! You can get really fine, precise cuts without feeling like you are going to break your finger off. I just used my paper snips to cut the house out of the kraft paper. 

dsc_0014Next I stamped the same image again, this time using a brown ink onto white or eggshell cardstock cut using my square Nestabilities. I then stamped in the wreath using green ink and very quickly colored in the ribbon with a red marker. When I say quickly, I mean quickly - you don't have to be terribly precise, you are just going for the look of a wreath hanging in the window.         
Notice how I used a slightly smaller square then the house? The roof overhangs it slightly as you'll see in the finished card. I did not cut off the top of the house on the kraft piece. At this point you need to allow the stamped image to air dry for an hour or heat-set with your embossing gun. If it's not dry, the ink will bleed and look fuzzy after adding the window treatment.


dsc_0016 
dsc_0018

Apply dimensional adhesive to the back of your kraft house, and adhere to the white stamped image, lining up the windows. 


dsc_0019Now, just take some Glossy Accents or Crystal Effects (Stampin' Up!) and squeeze some into the window opening. These mediums are thick enough that they won't leak through the sides of the house, they will stay within the edges of the window openings. Probably any glossy medium would work here, Diamond Glaze, Sculpey Glaze, etc.  You'll need to allow this to dry for 3-4 hours. 


After this is done, assemble your card as desired and voila!


iphoto-47


Friday, December 12, 2008

Home for the Holidays


Is this my first Christmas card post? Seriously folks, I'm so far behind. I'm happy and blessed to be working full-time, but I'm so exhausted at night I just haven't had much energy to be crafty.

However, I have found a new time to get stuff done. I have an hour lunch break and so earlier this week I took my Revolution and some paper and did some die-cutting in my car during my lunch hour. Isn't that sad? I eat lunch in the car! I'm learning to embrace the quiet, but I have to keep my radio off because it drains the battery. I had to have somebody jump-start me today! Anyway, the Revolution is PERFECT for car die-cutting. I'm going to leave in my trunk. It's small enough that I can hold it, but it has a nice magnetic base so my nesties don't slide around. Awesome.

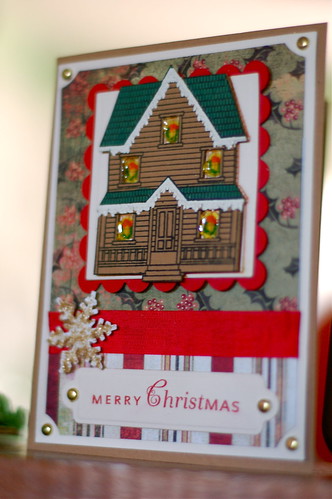
This is one of my Christmas cards this year. I'll probably only get out 10 or so of these because of the amount of time it takes to make each one. I cut out the red scallops and vanilla squares during my lunch break :)

Recipe:
Stamps: Papertrey Ink
Boards & Beams, Papertrey Ink Home for the Holidays, Papertrey Ink Silent Night
Paper: PTI Vintage Cream, PTI Pure Poppy, Kraft, Cosmo Cricket, Basic Grey Wassail
Ink: PTI Pure Poppy, Distress Tea Dye, Stampin' Up! Black, Palette green (doesn't matter what shades you use really)
Ribbon: Martha Stewart Red Seam Binding
Accessories: Tim Holtz Distress Stickles, MS Snowflake Punch, Gold brads, Markers, Nestabilities square, scallop square, and tag die, Ranger Glossy Accents
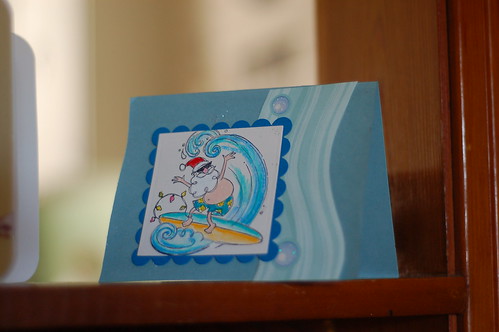